数据库专有名词扫盲

JdbcTemplate 、Mybatis、ORM 、Druid 、HikariCP 、Hibernate是什么?它们有什么关系?

学完Spring和SpringMVC之后,就急于求成的开始学习起SpringBoot而暂时忽略了Mybatis,然后在SpringBoot的学习过程中就开始对这些框架感到非常的迷惑,主要集中于一下几个东西:

JdbcTemplateMybatisORMDruidHikariCPHibernate

以至于晕晕乎乎的看了很多博客之后连最开始学的jdbc是什么都有点迷惑了,然后最近把Mybatis学了一点之后开始对这些概念有了一些认识。

首先Druid、HikariCP是数据库连接池,那么什么是数据库连接池呢?我们为什么需要数据库连接池呢?

数据库连接池官方一点的解释就是数据库连接池负责分配、管理和释放数据库连接,它允许应用程序重复使用一个现有的数据库连接,而不是再重新建立一个。简单说就是把数据库连接的工作交给他,我们要用数据库连接的时候就找他要,就是这么简单一回事。

那我们为什么需要数据库连接池呢?那我们先来分析一下当你执行一个查询操作时有哪些你看不到的操作再背后默默为你这一行不负责任的代码买单

  1. TCP 建立连接的三次握手(客户端与 MySQL 服务器的连接基于 TCP 协议)

  2. MySQL 认证的三次握手(包括用户鉴权的一些操作)

  3. 真正的 SQL 执行

  4. MySQL 的关闭

  5. TCP 的四次握手关闭

这些操作涉及到网络,建立网络连接的过程对于CPU来说很慢啊,而且就算你说你用本地的数据库,你不用担心网络问题,但是还是涉及到读写磁盘的这种IO操作啊,还是很慢,我们不能接受这种慢,所以就有了数据库连接池

数据库连接池的工作机制:

数据库连接池在初始化时将创建一定数量的数据库连接放到连接池中,这些数据库连接的数量是由最小数据库连接数来设定的。无论这些数据库连接是否被使用,连接池都将一直保证至少拥有这么多的连接数量。当应用程序向连接池请求的连接数超过最大连接数量时,这些请求将被加入到等待队列中。

就是在程序初始化数据库连接池的时候就创建好了这些连接,而且无论是否使用都一直持有,当有程序想要这个连接的时候就会给你分一个连接,就不用花那么多时间和资源去重新建立一个新的连接了。

Druid和HikariCP是两种数据库连接池,前者是国货之光,是阿里巴巴的东西想想阿里巴巴旗下的产品就知道这东西肯定强,至于HikariCP,我还不是很了解,但是既然SpringBoot选择集成它,它肯定还是很强的。

那么JdbcTemplate、 Mybatis、ORM 、Hibernate又是什么东西呢?

先说说ORM,一看就知道是缩写,全称是Object Relational Mapping

直译过来就是对象关系映射

维基百科:

面向对象是从软件工程基本原则(如耦合、聚合、封装)的基础上发展起来的,而关系数据库则是从数学理论发展而来的,两套理论存在显著的区别。为了解决这个不匹配的现象,对象关系映射技术应运而生。

通俗点说就是程序员喜欢面向对象的思想,关系型数据库又是从数学理论发展而来的,就导致程序员不能开开心心的用面向对象的思想来操作数据库,就用起来很不爽(仔细想想确实是这样,就好比你要往数据库里插入一个用户,以前用原生的jdbc我们需要把用户这个实体类的每一个属性都取出来再往SQL语句里面去拼,当时就在想我为什么不能直接把这个对象传进去呢,那多方便。)然后为了解决这种不爽,ORM应运而生!

这只是简单的介绍一下,大概知道这是个什么东西就行,要知道更多关于ORM的好处什么的自行百度。

JdbcTemplate、 Mybatis、Hibernate这三个(其实还有)就是ORM映射工具。

其中由于大家天天说SSM框架,我还以为SpingBoot内置了Mybatis,其实没有,它内置的是JdbcTemplate,其实也不能说是SpringBoot内置了,Spring就把它内置了。

所以SpringBoot要想用Mybatis还是乖乖自己导吧。


提示工程概要

提示工程

1. 两大原则

原则 1:编写清晰具体的说明

  1. 使用分隔符

    • 三引号:"""
    • 三个反引号:```
    • 三个破折号:—
    • 尖括号:<>
    • XML标签:
  2. 要求结构化输出

    • HTML
    • JSON
    • XML
    • Python字典
  3. 检查条件是否满足

    • 检查执行任务所需的假设
  4. 少量样本提示

    • 先给出完成任务的成功示例
    • 如何再让模型执行任务

原则2:给模型足够的时间思考

  1. 指定任务完成的步骤:
    第一步:…

    第二步:…

    第三步:…

    第N步:…

  2. 指示模型在给出结论之前提出自己的解决步骤(方案)

提醒

要注意LLM的“幻觉”(hallucination)现象,就是LLM会一本正经的胡说八道,给出一些错误信息,往往这些错误信息难以发觉。

避免手段:要求LLM首先找到相关引用,然后要求它使用这些引用来回答问题

2. 迭代

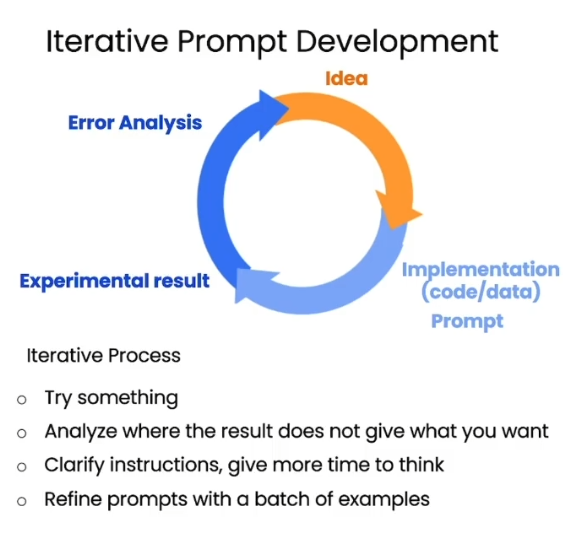
一般来说我们很难一次性就让LLM输出我们想要的内容,我们可以根据当前输出的内容以此基础一步一步迭代出我们想要的内容,大概过程如下

其中,第四步指的是在一些实践中,我们可以用小批量的测试来改进我们的prompts

3. 摘要

我们可以很方便的利用LLM来进行一些文字总结、提炼的工作

  1. 生成文章摘要
  2. 总结,可以带入上下文,让LLM进行更有针对性的总结,例如顾客对某件商品的评价,如果我们是商家,我们可以让LLM更侧重于总结价格之类的情况,而如果我们是快递公司,我们可以让LLM更侧重于总结快递速度之类的情况

4. 推理

  1. 情感分析,可以利用LLM进行结构化输出,例如对某件商品的评论区,可以逐条评论进行情感分析来了解多少个好评多少个差评,例如:

    1
    f'''这是一个商品的评价,请你分析一下这是一条好评还是差评,如果是好评,就输出True,否则输出False,评价如下{msg}'''
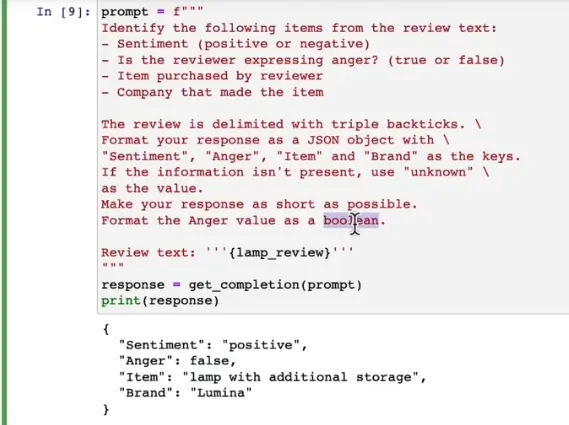
  2. 可以将自己想知道的信息封装为一个json来利用大模型进行结构化输出,例如

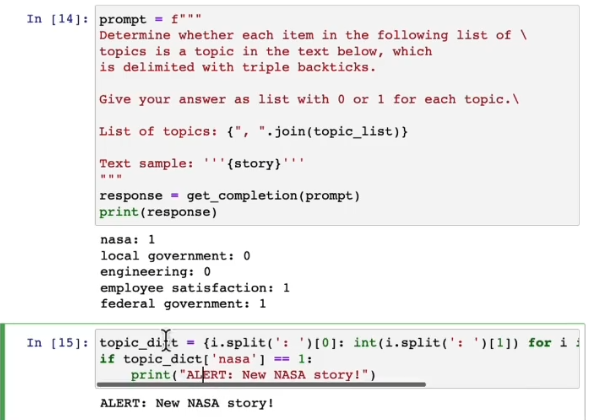
  3. 关键词总结,下面是一个关键词总结的应用,旨在读取某一段新闻,如果该新闻是关于nasa的,就告警(这个代码不太健壮,因为每种大模型输出可能不太相同,我们可以让它输出JSON格式来增强代码的健壮性)

5. 转换

  1. 最多应用的就是翻译,在进行翻译时候我们需要注意到不同语言在不同场合和心情下翻译出来是不一样的,因此我们可以加上我们要翻译的句子的语境

  2. 当你输入一段文字,让大模型说出是什么语言时,可以让它就用一个词来回答,从而获得结构化数据

  3. 可以将不太正式的语言转换为正式语言,例如JSON,XML,字典相互转换

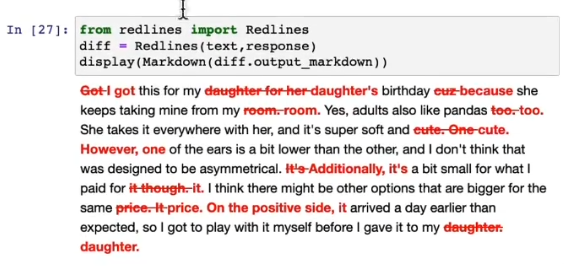
  4. 拼写检查和语法检查,对外语尤其有用可以使用一些工具来展示错误

6. 扩展

  1. 是指将短文本(例如一组说明或者主题列表)通过大语言模型转化为更长的文本(如一封电子邮件或一篇关于某个主题的文章)
  2. 例如我们可以根据客户在产品评论区对于产品的评价进行个性化回复
  3. temperature,指模型的随机性,值越小,模型越稳定,值越大,模型创造力更强,输出更不稳定

7. 聊天机器人

疑点解决:要达到聊天效果,也就是让LLM记住上下文,需要在本地存储上下文,每次发送给LLM时需要在前面加上上下文


关于git切换分支后该分支的修改会在另一个分支里面一起修改的问题

关于git切换分支后该分支的修改会在另一个分支里面一起修改的问题

修改分支后导致稳定版的主分支里面的文件连带修改。

原因:切换分支前原分支没有提交,导致新建的文件或者文件夹,没有纳入版本管理,所以会被带到切换的分支。

解决方案

在切换分支前commit一次

然后在万能的CSDN上面发现了另外一种解决方法:

利用git stash命令,在每次切换分支前git stash一次

这个命令时用作暂时保存,当你任务做了一半不想提交但是你现在不得不切换分支做别的任务的的时候就可以使用这个命令

当你把分支切换回来时,执行git stash pop

具体用法:git stash


从Spring官网下载jar包的步骤

从Spring官网下载jar包的步骤

相信很多人被Spring官网的这个图折磨过,然后搞不明白为什么要把这个jar包藏得这么好

正确的下载步骤:

注:

  1. 如果github打不开的话可以尝试这个链接直接到最后一步 点此链接
  2. 如果以上方法不行,而且你的github也访问不了,可以直接去我的码云下载最新版(不知道过几天还是不是最新)我的码云地址
  1. 打开Spring官网

  2. 点击

  3. 点击github图标![image-20210805210615525]

  4. 鼠标翻到页面下面点击 Spring Framework Artifacts

  5. 点击*Spring Artifactory*

  6. 点击libs-release-local

  7. org/

  8. springframework/

  9. spring/

  10. 然后就有各个版本可以选择


SpringBoot集成maven仓库里面没有包

SpringBoot打包maven仓库里面没有的包

在遇到一些自定义的jar包,maven仓库里面没有这些包,但是发布线上时我们还是只想发布一个jar包,也就是我们想要把第三方包打在最后生成的大jar包里

  1. 在根目录新建一个lib目录,把jar包放入lib目录

  2. 在pom.xml里面先放入这段代码表示导入这个包,从根目录的lib文件夹里面导

    1
    2
    3
    4
    5
    6
    7
    <dependency>
    <groupId>com.arcsoft.face</groupId>
    <artifactId>com.arcsoft.face</artifactId>
    <version>3.0.0.0</version>
    <scope>system</scope>
    <systemPath>${basedir}/lib/arcsoft-sdk-face-3.0.0.0.jar</systemPath>
    </dependency>
  3. 在pom.xml里面配置springboot的插件

    1
    2
    3
    4
    5
    6
    7
    8
    9
    10
    11
    12
    <build>
    <plugins>
    <plugin>
    <groupId>org.springframework.boot</groupId>
    <artifactId>spring-boot-maven-plugin</artifactId>
    <configuration>
    <executable>true</executable>
    <includeSystemScope>true</includeSystemScope>
    </configuration>
    </plugin>
    </plugins>
    </build>

    这样就可以了


设置自增触发器

数据库设置一个触发器用于记录最后一次更改时间

1
2
3
4
5
6
CREATE TRIGGER 触发器名
BEFORE UPDATE ON
表名 FOR EACH ROW
BEGIN
SET NEW.字段名=now();
END

BFS算法实现迷宫问题

BFS实现迷宫问题

问题描述,要求从起点走到终点,找出最短的距离,要避开障碍

输入描述,输入一个二维数组表示地图,其中等于10就是终点,等于-10就是起点,等于1就是障碍,等于0就是可以走的

代码:

1
2
3
4
5
6
7
8
9
10
11
12
13
14
15
16
17
18
19
20
21
22
23
24
25
26
27
28
29
30
31
32
33
34
35
36
37
38
39
40
41
42
43
44
45
46
47
48
49
50
51
52
53
54
55
56
57
58
59
60
61
62
63
64
65
66
67
68
69
70
71
72
73
74
75
76
77
78
79
80
81
82
83
84
85
86
87
88
89
90
91
92
93
94
95
96
97
98
99
100
101
102
103
104
105
106
107
108
109
110
111
112
113
114
115
116
117
118
119
120
121
122
123
124
125
126
127
128
129
130
131
132
133
134
135
136
137
138
139
140
141
142
143
144
145
146
147
148
149
150
151
152
153
154
155
156
157
158
159
160
161
162
163
164
165
166
167
168
169
170
171
172
173
174
175
176
177
178
179
import java.util.LinkedList;
import java.util.Queue;

/**
* @author xuziao
* @date 2021/10/17 19:40
*/

public class BFS {
public static int getShort(int[][] map){
int ans = 0;
int startX = 0;
int startY = 0;
int maxX = map.length - 1;
int maxY = map[0].length - 1;

Queue<Coordinate> coordinateQueue = new LinkedList<>();

for (int x = 0; x < map.length; x++) {
for (int y = 0; y < map[0].length; y++){
if (map[x][y] == -10) {
startX = x;
startY = y;
}
}
}

MovePoint movePoint = new MovePoint(map, maxX, maxY);

Coordinate coordinate = new Coordinate(startX, startY, 0);
coordinateQueue.add(coordinate);

while (true) {
if (coordinateQueue.isEmpty()) {
break;
}
Coordinate point = coordinateQueue.poll();
movePoint.setCoordinate(point);
Coordinate l = movePoint.left();
Coordinate b = movePoint.bottom();
Coordinate t = movePoint.top();
Coordinate r = movePoint.right();
if (l != null) {
if (isAns(l, map)) {
ans = l.step;
break;
}
coordinateQueue.add(l);
}
if (b != null) {
if (isAns(b, map)) {
ans = b.step;
break;
}
coordinateQueue.add(b);
}
if (t != null) {
if (isAns(t, map)) {
ans = t.step;
break;
}
coordinateQueue.add(t);
}
if (r != null) {
if (isAns(r, map)) {
ans = r.step;
break;
}
coordinateQueue.add(r);
}
}
return ans;
}

private static boolean isAns(Coordinate coordinate, int[][] map) {
return map[coordinate.getX()][coordinate.getY()] == 10;
}

public static void main(String[] args) {
//测试数据,-10代表起点,10代表终点,1代表墙
int[][] data = {{-10, 0, 0, 0}, {0, 1, 0, 1}, {0, 0, 1, 10}, {1, 0, 0, 0}};
System.out.println(isAns(new Coordinate(2, 3, 0), data));
//start:(0, 0) end(2, 3)
}
}


class Coordinate {
int x;
int y;
int step = 0;
public Coordinate(int x, int y, int step) {
this.x = x;
this.y = y;
this.step = step;
}

public int getX() {
return x;
}
public int getY() {
return y;
}
}

class MovePoint{
Coordinate coordinate;
private final int maxX;
private final int maxY;
private final int[][] map;
MovePoint(int[][] map, int maxX, int maxY) {
this.maxY = maxY;
this.maxX = maxX;
this.map = map;
}

public void setCoordinate(Coordinate coordinate) {
this.coordinate = coordinate;
}

public Coordinate top() {
int x = coordinate.getX() - 1;
int y = coordinate.getY();
//判断点是否超出边界
boolean isLegal = x > maxX || x < 0 || y > maxY || y < 0 || map[x][y] == 1;
if (isLegal) {
return null;
} else {
map [x][y] = map[x][y] == 10 ? 10 : 1;
coordinate.step++;
return new Coordinate(x, y, coordinate.step);
}
}

public Coordinate bottom() {
int x = coordinate.getX() + 1;
int y = coordinate.getY();
//判断点是否超出边界
boolean isLegal = x > maxX || x < 0 || y > maxY || y < 0 || map[x][y] == 1;
if (isLegal) {
return null;
} else {
map[x][y] = 1;
coordinate.step++;
return new Coordinate(x, y, coordinate.step);
}
}

public Coordinate right() {
int x = coordinate.getX();
int y = coordinate.getY() + 1;
//判断点是否超出边界
boolean isLegal = x > maxX || x < 0 || y > maxY || y < 0 || map[x][y] == 1;
if (isLegal) {
return null;
} else {
map[x][y] = 1;
coordinate.step++;
return new Coordinate(x, y, coordinate.step);
}
}

public Coordinate left() {
int x = coordinate.getX();
int y = coordinate.getY() - 1;
//判断点是否超出边界
boolean isLegal = x > maxX || x < 0 || y > maxY || y < 0 || map[x][y] == 1;
if (isLegal) {
return null;
} else {
map[x][y] = 1;
coordinate.step++;
return new Coordinate(x, y, coordinate.step);
}
}

}


卷积神经网络

卷积神经网络中nn.Conv2d()和nn.MaxPool2d()

卷积神经网络之Pythorch实现:

nn.Conv2d()就是PyTorch中的卷积模块

参数列表

参数 作用
in_channels 输入数据体的深度
out_channels 输出数 据体的深度
kernel_size 滤波器(卷积核)的大小 注1
stride 滑动的步长
padding 零填充的圈数 注2
bias 是否启用偏置,默认是True,代表启用
groups 输出数据体深度上和输入数 据体深度上的联系 注3
dilation 卷积对于输入数据体的空间间隔 注4

注:1. 可以使用一 个数字来表示高和宽相同的卷积核,比如 kernel_size=3,也可以使用 不同的数字来表示高和宽不同的卷积核,比如 kernel_size=(3, 2);

  1. padding=0表示四周不进行零填充,而 padding=1表示四周进行1个像素点的零填充;

  2. groups表示输出数据体深度上和输入数 据体深度上的联系,默认 groups=1,也就是所有的输出和输入都是相 关联的,如果 groups=2,这表示输入的深度被分割成两份,输出的深 度也被分割成两份,它们之间分别对应起来,所以要求输出和输入都 必须要能被 groups整除。

  3. 默认dilation=1详情见 nn.Conv2d()中dilation参数的作用或者CSDN

nn.MaxPool2d()表示网络中的最大值池化

参数列表:

参数 作用
kernel_size 与上面nn.Conv2d()相同
stride 与上面nn.Conv2d()相同
padding 与上面nn.Conv2d()相同
dilation 与上面nn.Conv2d()相同
return_indices 表示是否返回最大值所处的下标,默认 return_indices=False
ceil_mode 表示使用一些方格代替层结构,默认 ceil_mode=False

注:一般不会去设置return_indicesceil_mode参数

1
2
3
4
5
6
7
8
9
10
11
12
13
14
15
16
17
18
19
20
21
22
23
24
25
26
27
28
29
30
31
32
33
34
35
36
37
38
39
40
41
42
43
import torch.nn as nn


class SimpleCNN(nn.Module):
def __init__(self):
super(SimpleCNN, self).__init__()
layer1 = nn.Sequential()
# 把一个三通道的照片RGB三个使用32组卷积核卷积,每组三个卷积核,组内卷积后相加得出32组输出
layer1.add_module('conv1', nn.Conv2d(3, 32, (3, 3), (1, 1), padding=1))
layer1.add_module('relu1', nn.ReLU(True))
layer1.add_module('pool1', nn.MaxPool2d(2, 2))
self.layer1 = layer1

layer2 = nn.Sequential()
layer2.add_module('conv2', nn.Conv2d(32, 64, (3, 3), (1, 1), padding=1))
layer2.add_module('relu2', nn.ReLU(True))
layer2.add_module('pool2', nn.MaxPool2d(2, 2))
self.layer2 = layer2

layer3 = nn.Sequential()
layer3.add_module('conv3', nn.Conv2d(64, 128, (3, 3), (1, 1), padding=1))
layer3.add_module('relu3', nn.ReLU(True))
layer3.add_module('pool3', nn.MaxPool2d(2, 2))
self.layer3 = layer3

layer4 = nn.Sequential()
layer4.add_module('fc1', nn.Linear(2048, 512))
layer4.add_module('fc_relu1', nn.ReLU(True))
layer4.add_module('fc2', nn.Linear(512, 64))
layer4.add_module('fc_relu2', nn.ReLU(True))
layer4.add_module('f3', nn.Linear(64, 10))
self.layer4 = layer4

def forward(self, x):
conv1 = self.layer1(x)
conv2 = self.layer2(conv1)
conv3 = self.layer3(conv2)
fc_input = conv3.view(conv3.size(0), -1)
fc_out = self.layer4(fc_input)
return fc_out

model = SimpleCNN()
print(model)

输出

1
2
3
4
5
6
7
8
9
10
11
12
13
14
15
16
17
18
19
20
21
22
23
24
SimpleCNN(
(layer1): Sequential(
(conv1): Conv2d(3, 32, kernel_size=(3, 3), stride=(1, 1), padding=(1, 1))
(relu1): ReLU(inplace=True)
(pool1): MaxPool2d(kernel_size=2, stride=2, padding=0, dilation=1, ceil_mode=False)
)
(layer2): Sequential(
(conv2): Conv2d(32, 64, kernel_size=(3, 3), stride=(1, 1))
(relu2): ReLU(inplace=True)
(pool2): MaxPool2d(kernel_size=2, stride=2, padding=0, dilation=1, ceil_mode=False)
)
(layer3): Sequential(
(conv3): Conv2d(64, 128, kernel_size=(3, 3), stride=(1, 1), padding=(1, 1))
(relu3): ReLU(inplace=True)
(pool3): MaxPool2d(kernel_size=2, stride=2, padding=0, dilation=1, ceil_mode=False)
)
(layer4): Sequential(
(fc1): Linear(in_features=2048, out_features=512, bias=True)
(fc_relu1): ReLU(inplace=True)
(fc2): Linear(in_features=512, out_features=64, bias=True)
(fc_relu2): ReLU(inplace=True)
(f3): Linear(in_features=64, out_features=10, bias=True)
)
)

提取模型的层级结构

提取层级结构可以使用以下几个nn.Model的属性,第一个是children()属性,它会返回下一级模块的迭代器,在上面这个模型中,它会返回在self.layer1,self.layer2,self.layer4上的迭代器而不会返回它们内部的东西;modules()
会返回模型中所有的模块的迭代器,这样它就能访问到最内层,比如self.layer1.conv1这个模块;还有一个与它们相对应的是name_children()属性以及named_modules(),这两个不仅会返回模块的迭代器,还会返回网络层的名字。

提取出model中的前两层

1
nn.Sequential(*list(model.children())[:2])

输出:

1
2
3
4
5
6
7
8
9
10
11
12
Sequential(
(0): Sequential(
(conv1): Conv2d(3, 32, kernel_size=(3, 3), stride=(1, 1), padding=(1, 1))
(relu1): ReLU(inplace=True)
(pool1): MaxPool2d(kernel_size=2, stride=2, padding=0, dilation=1, ceil_mode=False)
)
(1): Sequential(
(conv2): Conv2d(32, 64, kernel_size=(3, 3), stride=(1, 1), padding=(1, 1))
(relu2): ReLU(inplace=True)
(pool2): MaxPool2d(kernel_size=2, stride=2, padding=0, dilation=1, ceil_mode=False)
)
)

提取出model中的所有卷积层

1
2
3
4
5
conv_model = nn.Sequential()
for layer in model.named_modules():
if isinstance(layer[1], nn.Conv2d):
conv_model.add_module(layer[0].split('.')[1] ,layer[1])
print(conv_model)

输出:

1
2
3
4
5
Sequential(
(conv1): Conv2d(3, 32, kernel_size=(3, 3), stride=(1, 1), padding=(1, 1))
(conv2): Conv2d(32, 64, kernel_size=(3, 3), stride=(1, 1), padding=(1, 1))
(conv3): Conv2d(64, 128, kernel_size=(3, 3), stride=(1, 1), padding=(1, 1))
)

提取网络参数并对其初始化

nn.Moudel里面有两个特别重要的关于参数的属性,分别是named_parameters()parameters()。前者会输出网络层的名字和参数的迭代器,后者会给出一个网络的全部参数的迭代器。

1
2
3
for param in model.named_parameters():
print(param[0])
# print(param[1])

输出:

1
2
3
4
5
6
7
8
9
10
11
12
layer1.conv1.weight
layer1.conv1.bias
layer2.conv2.weight
layer2.conv2.bias
layer3.conv3.weight
layer3.conv3.bias
layer4.fc1.weight
layer4.fc1.bias
layer4.fc2.weight
layer4.fc2.bias
layer4.f3.weight
layer4.f3.bias

主流神经网络案例分析

案例:使用卷积神经网络实现对Minist数据集的预测

1
2
3
4
5
6
7
8
9
10
11
12
13
14
15
16
17
18
19
20
21
22
23
24
25
26
27
28
29
30
31
32
33
34
35
36
37
38
39
40
41
42
43
44
45
46
47
48
49
50
51
52
53
54
55
56
57
58
59
60
61
62
63
64
65
66
67
68
69
70
71
72
73
74
75
76
77
78
79
80
81
82
83
84
85
86
87
88
89
90
91
92
93
94
95
96
97
98
99
100
101
102
103
104
105
106
107
108
109
110
111
112
113
114
115
116
117
118
119
120
121
122
123
124
125
import matplotlib.pyplot as plt
import torch.utils.data
import torchvision.datasets
import os
import torch.nn as nn
from torchvision import transforms


class CNN(nn.Module):
def __init__(self):
super(CNN, self).__init__()
self.layer1 = nn.Sequential(
nn.Conv2d(1, 16, kernel_size=(3, 3)),
nn.BatchNorm2d(16),
nn.ReLU(inplace=True),
)

self.layer2 = nn.Sequential(
nn.Conv2d(16, 32, kernel_size=(3, 3)),
nn.BatchNorm2d(32),
nn.ReLU(inplace=True),
nn.MaxPool2d(kernel_size=2, stride=2),
)

self.layer3 = nn.Sequential(
nn.Conv2d(32, 64, kernel_size=(3, 3)),
nn.BatchNorm2d(64),
nn.ReLU(inplace=True)
)

self.layer4 = nn.Sequential(
nn.Conv2d(64, 128, kernel_size=(3, 3)),
nn.BatchNorm2d(128),
nn.ReLU(inplace=True),
nn.MaxPool2d(kernel_size=2, stride=2)
)

self.fc = nn.Sequential(
nn.Linear(128 * 4 * 4, 1024),
nn.ReLU(inplace=True),
nn.Linear(1024, 128),
nn.Linear(128, 10)
)

def forward(self, x):
x = self.layer1(x)
x = self.layer2(x)
x = self.layer3(x)
x = self.layer4(x)
x = x.view(x.size(0), -1)
x = self.fc(x)
return x


os.environ["KMP_DUPLICATE_LIB_OK"] = "TRUE"

data_tf = transforms.Compose(
[transforms.ToTensor(),
transforms.Normalize([0.5], [0.5])]
)

train_dataset = torchvision.datasets.MNIST(root='F:/机器学习/pytorch/书/data/mnist', train=True,
transform=data_tf, download=True)

test_dataset = torchvision.datasets.MNIST(root='F:/机器学习/pytorch/书/data/mnist', train=False,
transform=data_tf, download=True)

batch_size = 100
train_loader = torch.utils.data.DataLoader(
dataset=train_dataset, batch_size=batch_size
)

test_loader = torch.utils.data.DataLoader(
dataset=test_dataset, batch_size=batch_size
)

model = CNN()
model = model.cuda()
criterion = nn.CrossEntropyLoss()
criterion = criterion.cuda()
optimizer = torch.optim.Adam(model.parameters())

# 节约时间,三次够了
iter_step = 3
loss1 = []
loss2 = []
for step in range(iter_step):
loss1_count = 0
loss2_count = 0
for images, labels in train_loader:
images = images.cuda()
labels = labels.cuda()
images = images.reshape(-1, 1, 28, 28)
output = model(images)
pred = output.squeeze()

optimizer.zero_grad()
loss = criterion(pred, labels)
loss.backward()
optimizer.step()

_, pred = torch.max(pred, 1)

loss1_count += int(torch.sum(pred == labels)) / 100
# 测试
else:
test_loss = 0
accuracy = 0
with torch.no_grad():
for images, labels in test_loader:
images = images.cuda()
labels = labels.cuda()
pred = model(images.reshape(-1, 1, 28, 28))
_, pred = torch.max(pred, 1)
loss2_count += int(torch.sum(pred == labels)) / 100

loss1.append(loss1_count / len(train_loader))
loss2.append(loss2_count / len(test_loader))

print(f'第{step}次训练:训练准确率:{loss1[len(loss1)-1]},测试准确率:{loss2[len(loss2)-1]}')

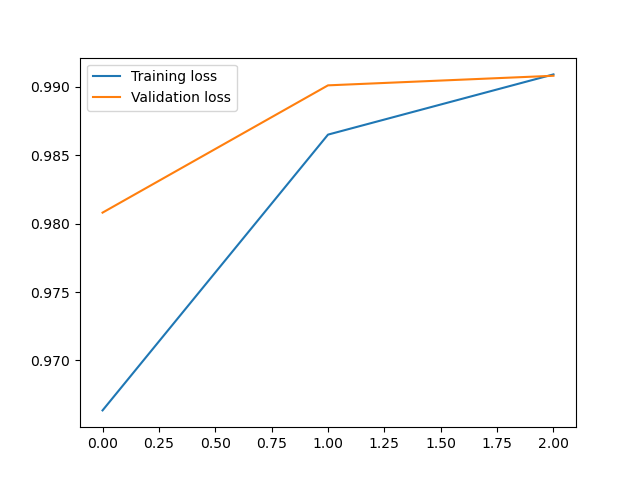
plt.plot(loss1, label='Training loss')
plt.plot(loss2, label='Validation loss')
plt.legend()

输出:

1
2
3
4
第0次训练:训练准确率:0.9646166666666718,测试准确率:0.9868999999999996
第1次训练:训练准确率:0.9865833333333389,测试准确率:0.9908999999999998
第2次训练:训练准确率:0.9917000000000039,测试准确率:0.9879999999999994
<matplotlib.legend.Legend at 0x21f03092fd0>


关于windows电脑上面创建Linux新用户的问题

Linux创建新用户时遇到的问题记录

创建新用户命令:

1
useradd -d "/home/guest" -m -s "/bin/bash" guest

报错:

1
useradd: cannot open /etc/passwd

按照网上的解决方案:

1
chattr -ia /etc/passwd

此时/etc/passwd的属性:

1
--------------e----- /etc/passwd

继续执行:

1
useradd -d "/home/guest" -m -s "/bin/bash" guest

继续报错:

1
useradd: cannot open /etc/passwd

继续查经验贴:

查到大概是因为是用的windows命令行登录Linux的原因,解决方案:

1
2
3
# 我这里是centOS,Ubuntu可以用 apt install dos2unix
yum install dos2unix
sudo dos2unix /etc/passwd

作者原文:

You most likely introduced some error in the passwd's syntax. You need to fix it.

Might be through editing from Windows you have introduced Windows line endings, try:

1
2
sudo apt install dos2unix
sudo dos2unix /etc/passwd

英语好的可以自行理解,文章出处:https://askubuntu.com/questions/1339468/useradd-cannot-open-etc-passwd

总结:

第一步:

1
chattr -ia /etc/passwd

第二布:

1
2
yum install dos2unix
sudo dos2unix /etc/passwd

第三步设置密码:

1
passwd guest

解决Python命令行报错问题

解决Python报错Failed calling sys.__interactivehook__

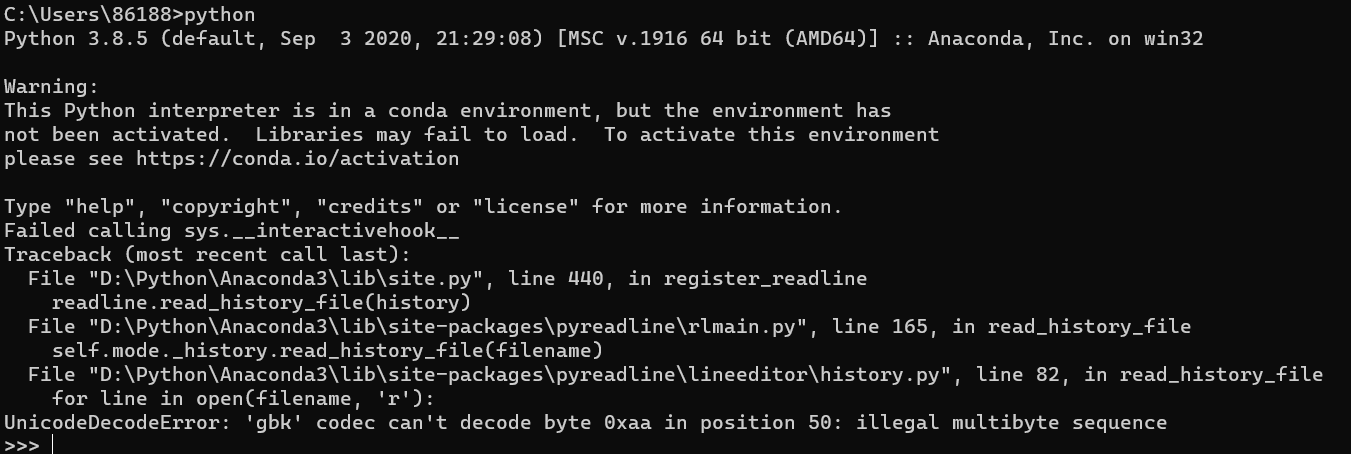
报错截图

报错截图

可以看到主要的报错信息

1
2
3
  File "D:\Python\Anaconda3\lib\site-packages\pyreadline\lineeditor\history.py", line 82, in read_history_file
for line in open(filename, 'r'):
UnicodeDecodeError: 'gbk' codec can't decode byte 0xaa in position 50: illegal multibyte sequence

找到这个history.py的文件的第82行,加上, encoding='utf-8'即可

保存再次运行就没问题了